Cover image generated by DALL-E 2 ("3D render of several tweets in a man hands on a dark blue background, digital art")
Due to the "recent" acquisition of Twitter and all changes that came after that, lots of users started considering other alternatives such as Mastodon, Tumblr, Nostr and many others...
But what happens to the generated data over the years we have been making in this platform, what do we make with them? Discarding them? My thoughts on this are... why not just keeping it safe for the future?
In this case it is where Tweetback come into action. An awesome project by Zach Leatherman to take ownership of your Twitter data in a public archive you can self-host (for example in GitHub).
Thanks to Zach Leatherman and its awesome project Tweetback, we can self host our own Twitter archive and keeping it up-to-date if necessary (just like I have done with mine).
The process to make your own archive is simple. Just follow the steps below.
This part is important to initialize our archive.
Twitter allows you to export a backup of all of your data you have in this platform.
As they explain in their help center, log in into your Twitter account (Web client) and:
- Click More in the main navigation menu to the left of your timeline.
- Select Settings and privacy.
- Select "Your Account" under Settings.
- Click on "Download an archive of your data".
Page where the data can be claimed
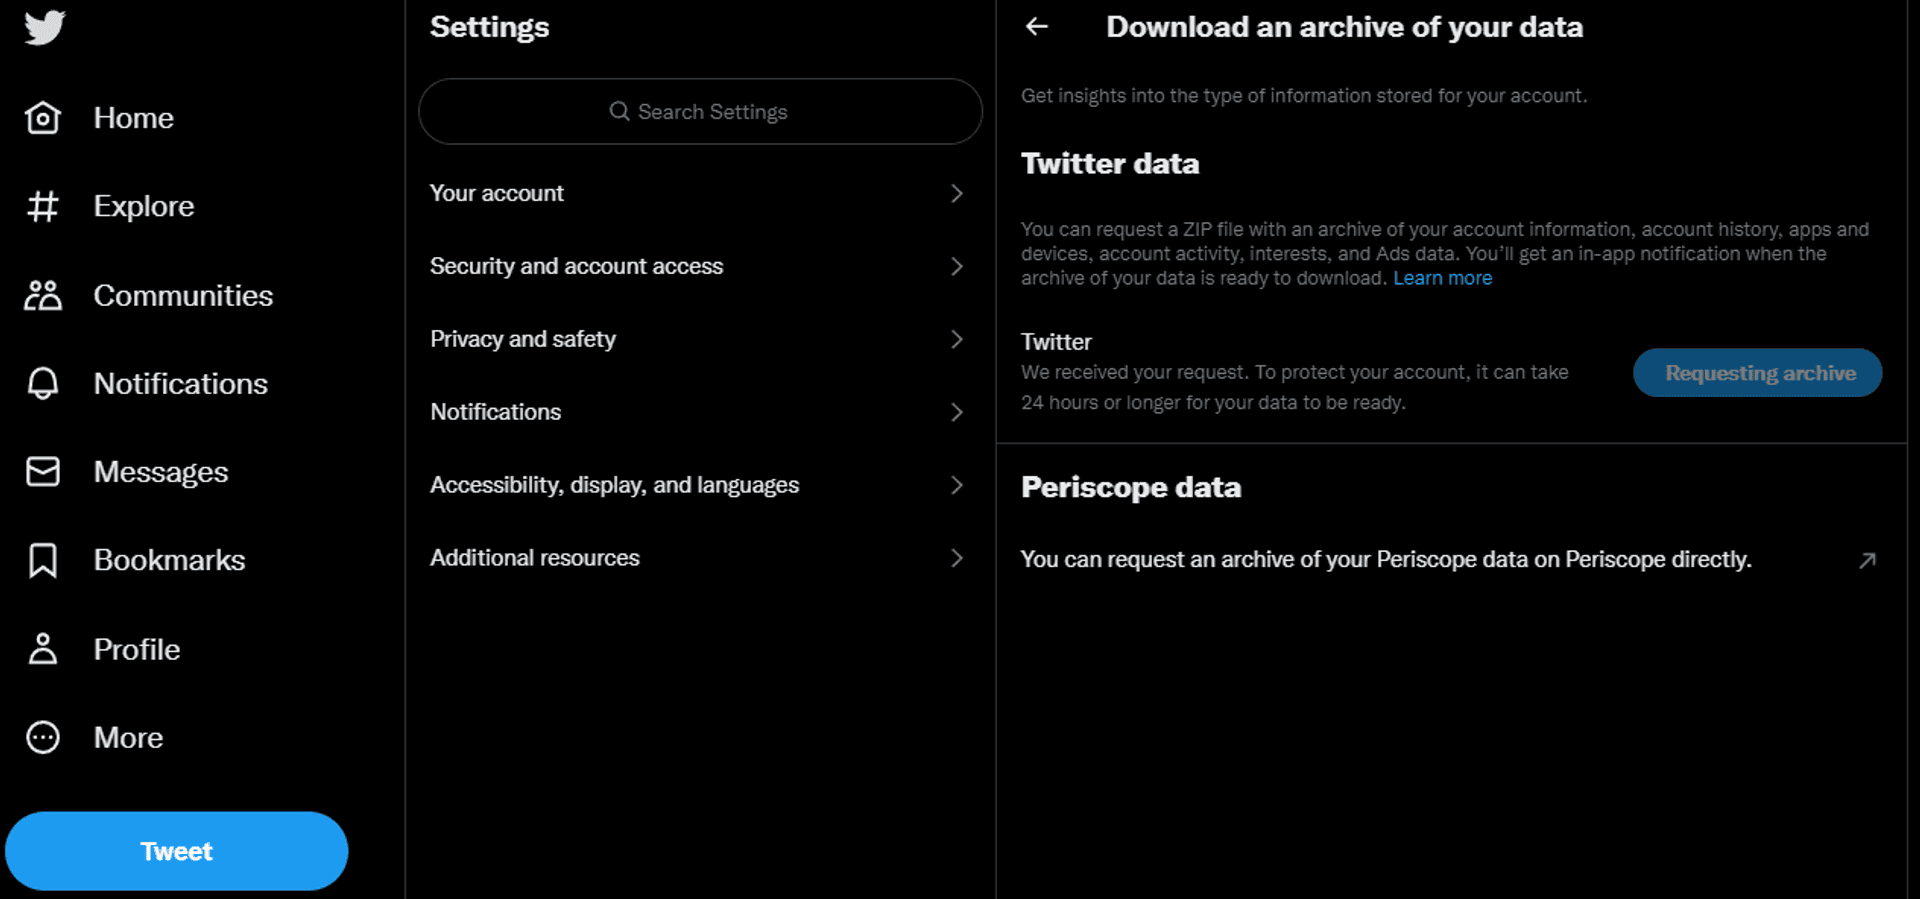
After clicking there, click in the button that says to request your archive. Then it will change the status to "Requesting archive".
Twitter settings page after requesting your archive
After taking this action, Twitter will collect your data and send you an email with a link to a .zip file with all your exported data. This process, can take up to 48 hours... so let's relax and keep with the process.
Note: don't forget to download the .zip file as soon as you receive the email and save it somewhere (as the links expires shortly).
Tweetback code and setting it up
In my case I just forked the repository but you can clone it and upload it to other site if you want.
Note that you will need to have Node.js installed (and Git of course).
Then follow this steps:
Clone the repo (or your fork):
git clone https://github.com/tweetback/tweetback.git
Note: if you choose creating a fork, the process of updating the repository for possible future changes from the base repository its easier with the "sync fork" option that GitHub provides.
Enter to the repository main folder with the terminal and perform a npm install (this will generate a package-lock.json file you will keep).
Following the instructions of Tweetback, open the zip file you downloaded from Twitter, and extract the data/tweets.js file from it into the database folder in your Tweetback repository folder.
Edit this file to change the first line window.YTD.tweet.part0 to module.exports (a simple replace) so the first part of the file will look as follows:
module.exports = [
{
    "tweet" : {
...
On the root folder of the repository run with the terminal the command npm run import which will perform the first initialization of our tweets database (going through the tweets.js file).
Note: if you have lots of tweets, the process can take a while...
At the end, you will see some output regarding counts and other info (but no errors).
After importing the tweets, we will be making some changes to the _data/metadata.js file, which will customize some page settings for our archive. We will modify the options as follows (leave the others without modifications):
username: your twitter handle without the @ symbolhomeLabel: the label that will appear at the top of your twitter archive... it will be a link to your home page, so call it accordingly.homeURL: URL to your home page in absolute format (for example "https://piraces.dev").
Metadata settings and where they reflect the changes
Now we are ready with our archive! Take a look at how it will be by running npm run start at the root folder and accessing the local URL that the process outputs to the terminal.
If everything looks good for you, commit and push your changes to the repository.
You can skip this step if your twitter archive will be in the root of a domain/subdomain (such as tweets.piraces.dev), otherwise we will have to set the subpath where it will be served (for example if hosting in GitHub pages such as piraces.github.io/tweets).
To do this, we will need to do some changes to the eleventy.config.js file as follows (at the end before the closing }):
...
    eleventyConfig.addPlugin(EleventyHtmlBasePlugin);
    return {pathPrefix: "/twitter/"}
};
Note: change the pathPrefix accordingly to the path you want.
In this tutorial we will be using GitHub Pages to host our twitter archive, so since in my case I have the domain piraces.dev managed by Cloudflare, I will create a subdomain called tweets.piraces.dev to point to the GitHub pages deployment.
To do this we will only have to create a CNAME DNS record with the value of the subdomain (tweets in this case) pointing to your GitHub domain that will be in the format GITHUB_HANDLE.github.io where GITHUB_HANDLE will be your handle/username in GitHub (piraces.github.io in my case).
CNAME DNS record pointing to GitHub pages
The picture above shows how to set it for Cloudflare, but it will be very similar in other providers.
Once our repo has all the changes mentioned above, we will have to configure GitHub pages for our repository.
To do so, we must follow this steps:
Create an empty branch named gh-pages (where the deployed page will be). From your terminal:
git switch --orphan gh-pages
git commit --allow-empty -m "Initial commit on orphan branch"
git push -u origin gh-pages
Go to the repository page in GitHub and click "Settings" and there "Pages" from the left toolbar.
In the "Pages" screen, we will be setting the options as follows:
- Source: select "Deploy from a branch"
- Branch: select the
gh-pages branch and / (root) as base folder. Then click "Save". - Custom domain: only if you have set a custom domain from the previous optional step. Enter the custom domain, click save and wait for GitHub to perform the DNS checks. Once GitHub finish the DNS checks, click on the "Enforce HTTPS" option.
GitHub pages settings example
Setup a workflow to publish the page on every push to main branch or manually. To do so, we must go to the "Actions" tab in the GitHub repository page, and then select "New workflow". From this page, we select "Skip this and set up a workflow yourself ->", then a editor appears and we can setup the workflow. You can use the following code (adapting some fields) to complete yours:
name: Publish page
on:
push:
branches: [ "main" ]
workflow_dispatch:
jobs:
build:
runs-on: ubuntu-latest
steps:
- uses: actions/checkout@v3
- name: Use Node.js 18.x
uses: actions/setup-node@v3
with:
node-version: 18.x
- run: npm ci
- run: npm run build
- name: Deploy to Github Pages
uses: crazy-max/ghaction-github-pages@v3
with:
build_dir: _site
fqdn: tweets.piraces.dev
jekyll: false
keep_history: true
env:
GITHUB_TOKEN: $
When finishing editing, click on "Start commit" and commit the workflow to the main branch. The workflow will start running after the commit, you can check the status from the "Actions tab" in the GitHub repository page.
If the workflow shows green (all steps are OK), go and check your URL and see your Twitter archive 🎉 (note, if something goes wrong with your configured subdomain, please revisit step 3).
If you may still using Twitter in the future, consider modifying the workflow created in the previous step to fetch all new tweets using the Twitter API.
To do so, you will need a Twitter bearer token. You will only be allowed to obtain a Twitter bearer token if you are a "Twitter developer" 😢, so you will have to fill some forms and apply to become one.
To start the process to become a "Twitter developer" visit developer.twitter.com, sign-in and start the process... It may be an annoying process with manually reviews.
Once you are a "Twitter developer", proceed to create an app and then getting its bearer token. Documentation about getting the bearer token can be found in the official developer documentation of Twitter.
When you have everything set-up correctly, copy the bearer token that will look like something like AAAA... (like random characters). Now go to the repository with your terminal and try to perform the update process for yourself locally (before modifying the remote workflow) to make sure everything goes smoothly.
When you are in the repository base path with your terminal, run the following command (where AAAAAA... is your actual complete bearer token):
TWITTER_BEARER_TOKEN=AAAAAA... npm run fetch-new-data
This will fetch any tweets that are not in the database because you made them later.
After fetching new tweets, you will need to rebuild your site with:
npm run build
Take a look to the updated archive by running it locally with npm run start and accessing the URL that the process outputs to the terminal.
If everything looks OK to you, we are ready to modify our GitHub workflow to automate this!
Follow then this steps:
Go to your repository GitHub page, select the "Actions" tab, select your workflow in the left navbar, locate the latest execution of the workflow and click on "View workflow file". After this, select the edit icon and start modifying your workflow.
Note: you can also modify the workflow in your local environment accessing the folder .github/workflows/ and editing the workflow.
We will be adding a new step after - run: npm ci to run the fetching process of new tweets. To do so, first you may need to add the Twitter bearer token as a secret to your actions (since you don't want it to be publicly visible). If you don't know how to do so, please follow the steps in the GitHub official documentation.
After declaring the secret, add a step after - run: npm ci like the following (assuming your secret is named TWITTER_BEARER_TOKEN, if not, change it accordingly):
...
- run: npm run fetch-new-data
env:
TWITTER_BEARER_TOKEN: $
In order to do this periodically, I decided to make my workflow run every night. To do so, you will only have to add a schedule entry in the on entry with a cron rule (adjust it if you want to your requirements):
name: Publish page
on:
push:
branches: [ "main" ]
schedule:
- cron: "30 0 * * *"
workflow_dispatch:
Your workflow now will look like this (with minimal differences):
name: Fetch new data & publish page
on:
push:
branches: [ "main" ]
schedule:
- cron: "30 0 * * *"
workflow_dispatch:
jobs:
build:
runs-on: ubuntu-latest
steps:
- uses: actions/checkout@v3
- name: Use Node.js 18.x
uses: actions/setup-node@v3
with:
node-version: 18.x
- run: npm ci
- run: npm run fetch-new-data
env:
TWITTER_BEARER_TOKEN: $
- run: npm run build
- name: Deploy to Github Pages
uses: crazy-max/ghaction-github-pages@v3
with:
build_dir: _site
fqdn: tweets.piraces.dev
jekyll: false
keep_history: true
env:
GITHUB_TOKEN: $
Save your workflow, commit and push it.
Checkout the execution process in the "Actions" tab of your GitHub repository to check everything goes OK.
You have now an "always updated" Twitter archive to be there for you and the people that may want to check it completely unattended! 🚀
Note: if you have any doubts regarding code/workflows you can always check my Twitter archive implementation: GitHub - piraces/twitter_archive.
tweetback-canonical is a package to resolve twitter URLs to new canonically hosted twitter backups,
made by Zach Leatherman too.
Simple follow the process in their README.md to add the URL of your Twitter
archive to the mapping.js file.
The process its very simple:
Create a fork of the tweetback-canonical repository.
Modify the mapping.js file adding your Twitter archive public URL to the end of the object, in the format:
"TWITTER_HANDLE": "FULL_URL_TO_TWITTER_ARCHIVE",
Note: your twitter handle must go without the @ symbol and you must end the line with a comma.
Commit and push your changes with a commit message with starts with mapping:.
Open a PR to the main branch of the official repository and wait for approval and merge.
You are done with all! Congrats! 🎉
We have seen in detail how to use the awesome Tweetback project to build and self-host our own Twitter archive/backup. Whether you may, or may not, want to get off Twitter, I think it's a great approach to get the ownership of your data anyways.
Doing this you are not exposed to lose the investment you put in generating those tweets if something bad happens (hopefully not 🙏).
Don't forget to report any issues you find to the official repository and thanks the author (Zach) for the awesome work!
Happy deploy! 🎉🎉
🙏🙏🙏
Since you've made it this far, sharing this article on your favorite social media network would be highly appreciated 😀! For feedback, please ping me on X.
Published